Friday, May 6, 2011

New Galaxy

I've had several people ask me how to create the "New Galaxy" effect I used in a recent Photoshop Challenge on the Photography Schoolhouse Forum. I got the idea from Advanced Photoshop Magazine but tweaked it to fit my needs.
1. Choose a picture with a dark background. This one is from stock.xchng.


2. Create a duplicate layer. Draw a shape in the dark area & erase everything else on the top layer.


 3. Click on FX > Outer Glow. Here are the settings I used.


4. Flatten the layers.


5. Filter > Render > Lens Flare > 35mm prime. Move center of lens flare to middle of green glow.


Hope that answers your questions. If you're not already a member, join in the fun at www.photographyschoolhouse.com. Share your pictures & your photography
questions and answers. You can also contact me at karenmillerphoto@gmail.com.


Friday, February 4, 2011

photo frames, masks & edges

Got the plain photo blues? Want to dress up your pics? Try downloading some frames and edges from http://www.photoduds.com/. Here are some samples from their Ambience collection. We'll start with a plain picture from stock.


TIPS FOR USING PHOTO MASKS
  • Open the photo mask
  • Drag the picture on top of it
  • Ctrl T to resize mask to fit, press Enter to finish.
  • Click on the photo layer. Go to Layer > Create Clipping Mask
  • Click on mask layer to adjust fit, move mask around as needed
  • Paint on mask layer with a black brush to remove pattern from faces & skin
  • Flatten layers
Here's a picture of the photo mask that was used to create the picture above. Find more photo frames, masks & templates at http://www.photoduds.com/


Experiment, have fun & contact me if you need help.

Remember to log onto http://www.photographyschoolhouse.com/ to talk to other photographers, ask questions, view the latest webinars and post your favorite pictures. 


Friday, January 21, 2011

Express yourself

Why limit yourself to just one business card - carry several in different sizes, shapes and designs so that you have one for every occasion.

Have you ever found yourself in a group and needed a conversation starter? Throw out the rules and create a card that's fresh and new. Save your boring old business card for boring business situations.


Saturday, January 15, 2011

Photoshop Game

This was my latest entry in a Photoshop before/after game with several photographer friends. Normally we make people younger in Photoshop so today's challenge was to make someone look older.

The before picture is a stock image from Deviant art.com http://browse.deviantart.com/?qh=&section=&q=sisters.III#/dfmmlv.


Stretched picture
Cropped
Extended dress
Darkened picture
Liquified face, arms, fingers & dress
Smoothed complexion
Cropped & cloned background
Added old book, hotel stamp & flourishes


Good game, everyone!
Karen

Thursday, November 11, 2010

Veterans Day - Before & After

Today's post is in honor of my dad, William J. Hansen, who passed away this year at age 92. We miss you & love you!

Here is the before picture -

Here is the same picture after a couple of hours in Photoshop. I cloned out all the dust spots and white marks, cropped the picture, added a touch of Lucis Art to sharpen it and a final run through Portraiture to smooth everything.


Every soldier needs a jeep so here's another Before & After of a military jeep parked at the Florida Carriage Museum during the Civil War Re-enactment and Military Display. The Before picture is SOOC.


The After picture was cropped, put through Lucis Art and had a water color filter added to it to bring out the texture and the details of the winch as well as the rest of the vehicle.


Thanks to all of our soldiers and veterans!!!!
Send your Photoshop/photography questions to karenmillerphoto@gmail.com.


Thursday, September 23, 2010

Decorative Photo Masks

Shirley, a Photoshop user from Arizona, sent an email about how to use photo masks with her pictures -  

"I have a picture with a black background and I can't figure out how to make those artistic edges with the white flowers & swirls."

Shirley, here's a picture of Nikki (a senior model) that I combined with a decorative photo mask from the Ambience Collection at PhotoDuds.


For today's example, create a new white background. File > New > Enter height, width & resolution


Make sure the picture and the decorative photo mask are aprox the same size & resolution as the new white background layer. Drag them onto the white background layer with the picture on the top layer.


Click on the picture layer and change the blending mode to Screen. Adjust the size of the photo mask and move it around by clicking on the second layer and using Ctrl T to make handles for the photo mask. Flatten the layers, add text, resize if needed and use unsharp mask 500/.2/0 to sharpen for the web.


Thanks go out to Shirley, for suggesting this week's Photoshop tutorial on decorative photo masks -


Monday, September 13, 2010

Wedding Albums

You know you're a photographer when you start asking for templates and camera gear on your birthday and at Christmas time. The Ambience design set from Beth Forester at PhotoDuds (aprox $125) has been on my wish list for a couple of months and I finally took advantage of her sale last week to give myself an early birthday gift. The Ambience tool kit consists of floral and watercolor backgrounds, brushes, overlays, textures, frames & templates. http://www.photoduds.com/store/product_info.php?cPath=34&products_id=295

Originally I thought to use this set for seniors or young girls but after experimenting with it realized it would be perfect for wedding albums as well. Today's blog is for all the wedding photographers who have asked for wedding album ideas. You can use these album ideas for engagement books, save the date cards, guest books, wedding albums, thank you cards and even boudoir books.

For marketing purposes, I've named each look. Feel free to use these names or make up your own.

1. Shabby Chic - A cottage style look that works well in the country or the city. This woman loves children, dog & cats. She can fix anything from bumps & scrapes to muddy pawprints.


2. Think Green - for the contemporary romantic woman who balances her quest for the perfect shoes with her desire to save the environment.


3. Handcrafted Vintage - for the woman who wears pearls and collects charm bracelets. She has a weakness for antique stores and vintage shops.


4. Bling - for the party diva who insists on a custom look for herself and her pictures. Don't expect her to be traditional in her color scheme or her music. 


Hope you enjoyed looking at these samples as much as I enjoyed putting them together and naming them. Our bride today came from stock photography - she was very patient and fit surprisingly well into all the looks. Please send your photo questions to:


Wednesday, September 8, 2010

Wedding Brush Tutorial

Here's another tutorial on using Photoshop brushes. Please refer back to the "Photoshop Brushes" blog if you have any questions. Today's post is for Mary Ann from Miami, a wedding photographer. 

"Help! I need a simple elegant way to decorate a modern bridal album page."

Search online for wedding brushes, floral brushes, flourishes & swirlies so that you have a good selection to choose from. Stock images were used for this example.


Drag the images you want to use onto a white background. Resize them & move them around as needed.


This design is pretty just the way it is so you could stop now or you can emboss the design to add a custom touch to your album page.


Thanks, Mary Ann for inspiring this blog.
Please send your photo questions to:


Tuesday, September 7, 2010

Photoshop Brushes

I was talking to a Photoshop newbie who complained -

"I just don't understand the whole Photoshop Brush thing."

Here's a quick overview for anyone else with the same problem.

One of the reasons why Photoshop Brushes can be confusing is because they are multi-purpose. You can paint with them like a regular artist's brush. You can stamp with them like a scrapbooker would use a rubber stamp. You can also scatter images randomly or leave a trail across the page.

The brush we'll be using today was downloaded from brusheezy.com. Always check the license to make sure you're not violating the copyright. Link back to the site if you're using it for a display or example and thank the designer to let them know you appreciate their work.

Here's the finished sample. I use these as marketing giveaways - my contact info is on the back.


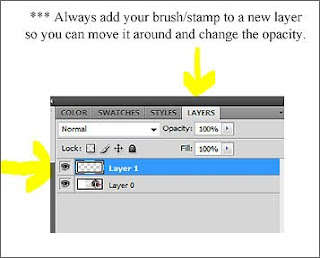
Save to your desktop. Right click on the zipped file to extract the brush file. I'm using CS4 & all I had to do was open the unzipped file and double click on Tickets & Labels to load the brushes into Photoshop.

Open your picture in Photoshop. Add the extra white space (Image > Increase Canvas > White). Crop to resize.


Add the remaining text layers using the regular Photoshop Text tool. If you need help with enlarging & rotating text, refer back to the blog on 3D Halloween Text.


The best way to learn a new skill is to keep on practicing.
Please send your photo questions to:

Saturday, September 4, 2010

Photo Booth/Event Pictures

Sara, a young photographer from UGA, is setting up a photo booth/event photography business.

"My pictures look kind of plain. Any suggestions for making them look more like a special souvenir?"

Here are a couple of suggestions that might help.

1. http://www.dennymfg.com/  for Freedom Cloth backdrops.

2. You can buy small decorative frames from Michael's  - 2x3, 3x3 & 3x4 inches as well as the larger sizes.

3. Purchase commercial templates from Graphic Authority, Photo Duds, etc.

4. Custom design your own digital photo frames using Serif PagePlus Graphic Design software. It's licensed for commercial use and priced between $79-$99. Here are some samples that I made using their design elements.


Hallmark sells blank, precut 4x8 glossy white photo cards at the office supply stores or on their website. You could also buy heavyweight glossy photo paper & cut it to size. Hope that helps, Sara.

Please send your photo questions to -

Friday, September 3, 2010

Desktop Publishing

Dan, a professional photographer from Illinois, wants to know -

"Why can't I sell the photo products I create with Print Artist?"

Desktop publishing software is licensed for either personal use or commercial use.

The consumer level programs like Print Artist are licensed for personal use. They are relatively inexpensive and are used to create personalized greeting cards, invitations, flyers and newsletters.

Small business owners can use them to create their own business cards, stationary & business forms, marketing materials, ads, brochures & catalogs. You cannot use consumer level programs to create items to sell to other people. You need to purchase a commercial use program for that.

Commercial Graphic Design Programs are more specialized & usually more expensive...but not always. Here's a list of commercial graphic design programs you can use to create items to sell.

Page Layout Programs -
Adobe InDesign
Quark Express
Serif PagePlus
Scribus *free

Illustration -
Adobe Illustrator
Corel Draw
Inkscape *free

Photo Editors -
Photoshop
GIMP *free

Click on this link for more information:
http://desktoppub.about.com/od/faq/ss/Readers-Choice-Desktop-Publishing-Finalists.htm
Serif PagePlus won the Reader's Choice Award for commercial desktop publishing programs. Priced at a very reasonable $69.99, it sounds too good to be true. I immediately went to their website and downloaded a free trial version. I'll let you know how it works out.

Thanks, everyone! Send your photo questions to -
karenmillerphoto@gmail.com

Thursday, September 2, 2010

Photoshop 3D Halloween Text

Several people from http://www.photographyschoolhouse.com/ have asked how to create the 3D Halloween text I used in the last Photoshop challenge. Here's the picture & here are the steps I used.

P.S. Original challenge picture supplied by Michelle.


Download the free Creepsville Halloween font at www.dafont.com/creepsville.font   Save the file to your desktop. Right click on the zipped file to unzip the file. Open the file and right click on the font to load it so you can use it in Photoshop.


If your text or your pictures look soft or fuzzy after resizing for the web go to:
 Filter > Sharpen > Unsharp Mask
500  .2  0

Thanks, everyone!  Send your photo questions to:

For those of you who are not members of http://www.photographyschoolhouse.com/ 
Join!   Post!   Participate!